Get Started with Alice 3 - Part 4 - Input, EventListeners, and the Beginnings of Mars Rover
Learning Objectives:
- How to create variables and assign them values
- How to get user input with requester
- Understand the basic concepts behind events and what events Alice can deal with
- Try out your knowledge on a Game of Mars Rover, Part 1 using event listeners to steer a robot witharrow keys and use proximityListener
Variables, Assignments, and Input
The project below is very simple, the man is asking the woman how many dogs she has, this continues until the man guesses the correct number (2). By keeping this game short, you can learn the basics of some key programming concepts without getting lost in a maze of code.
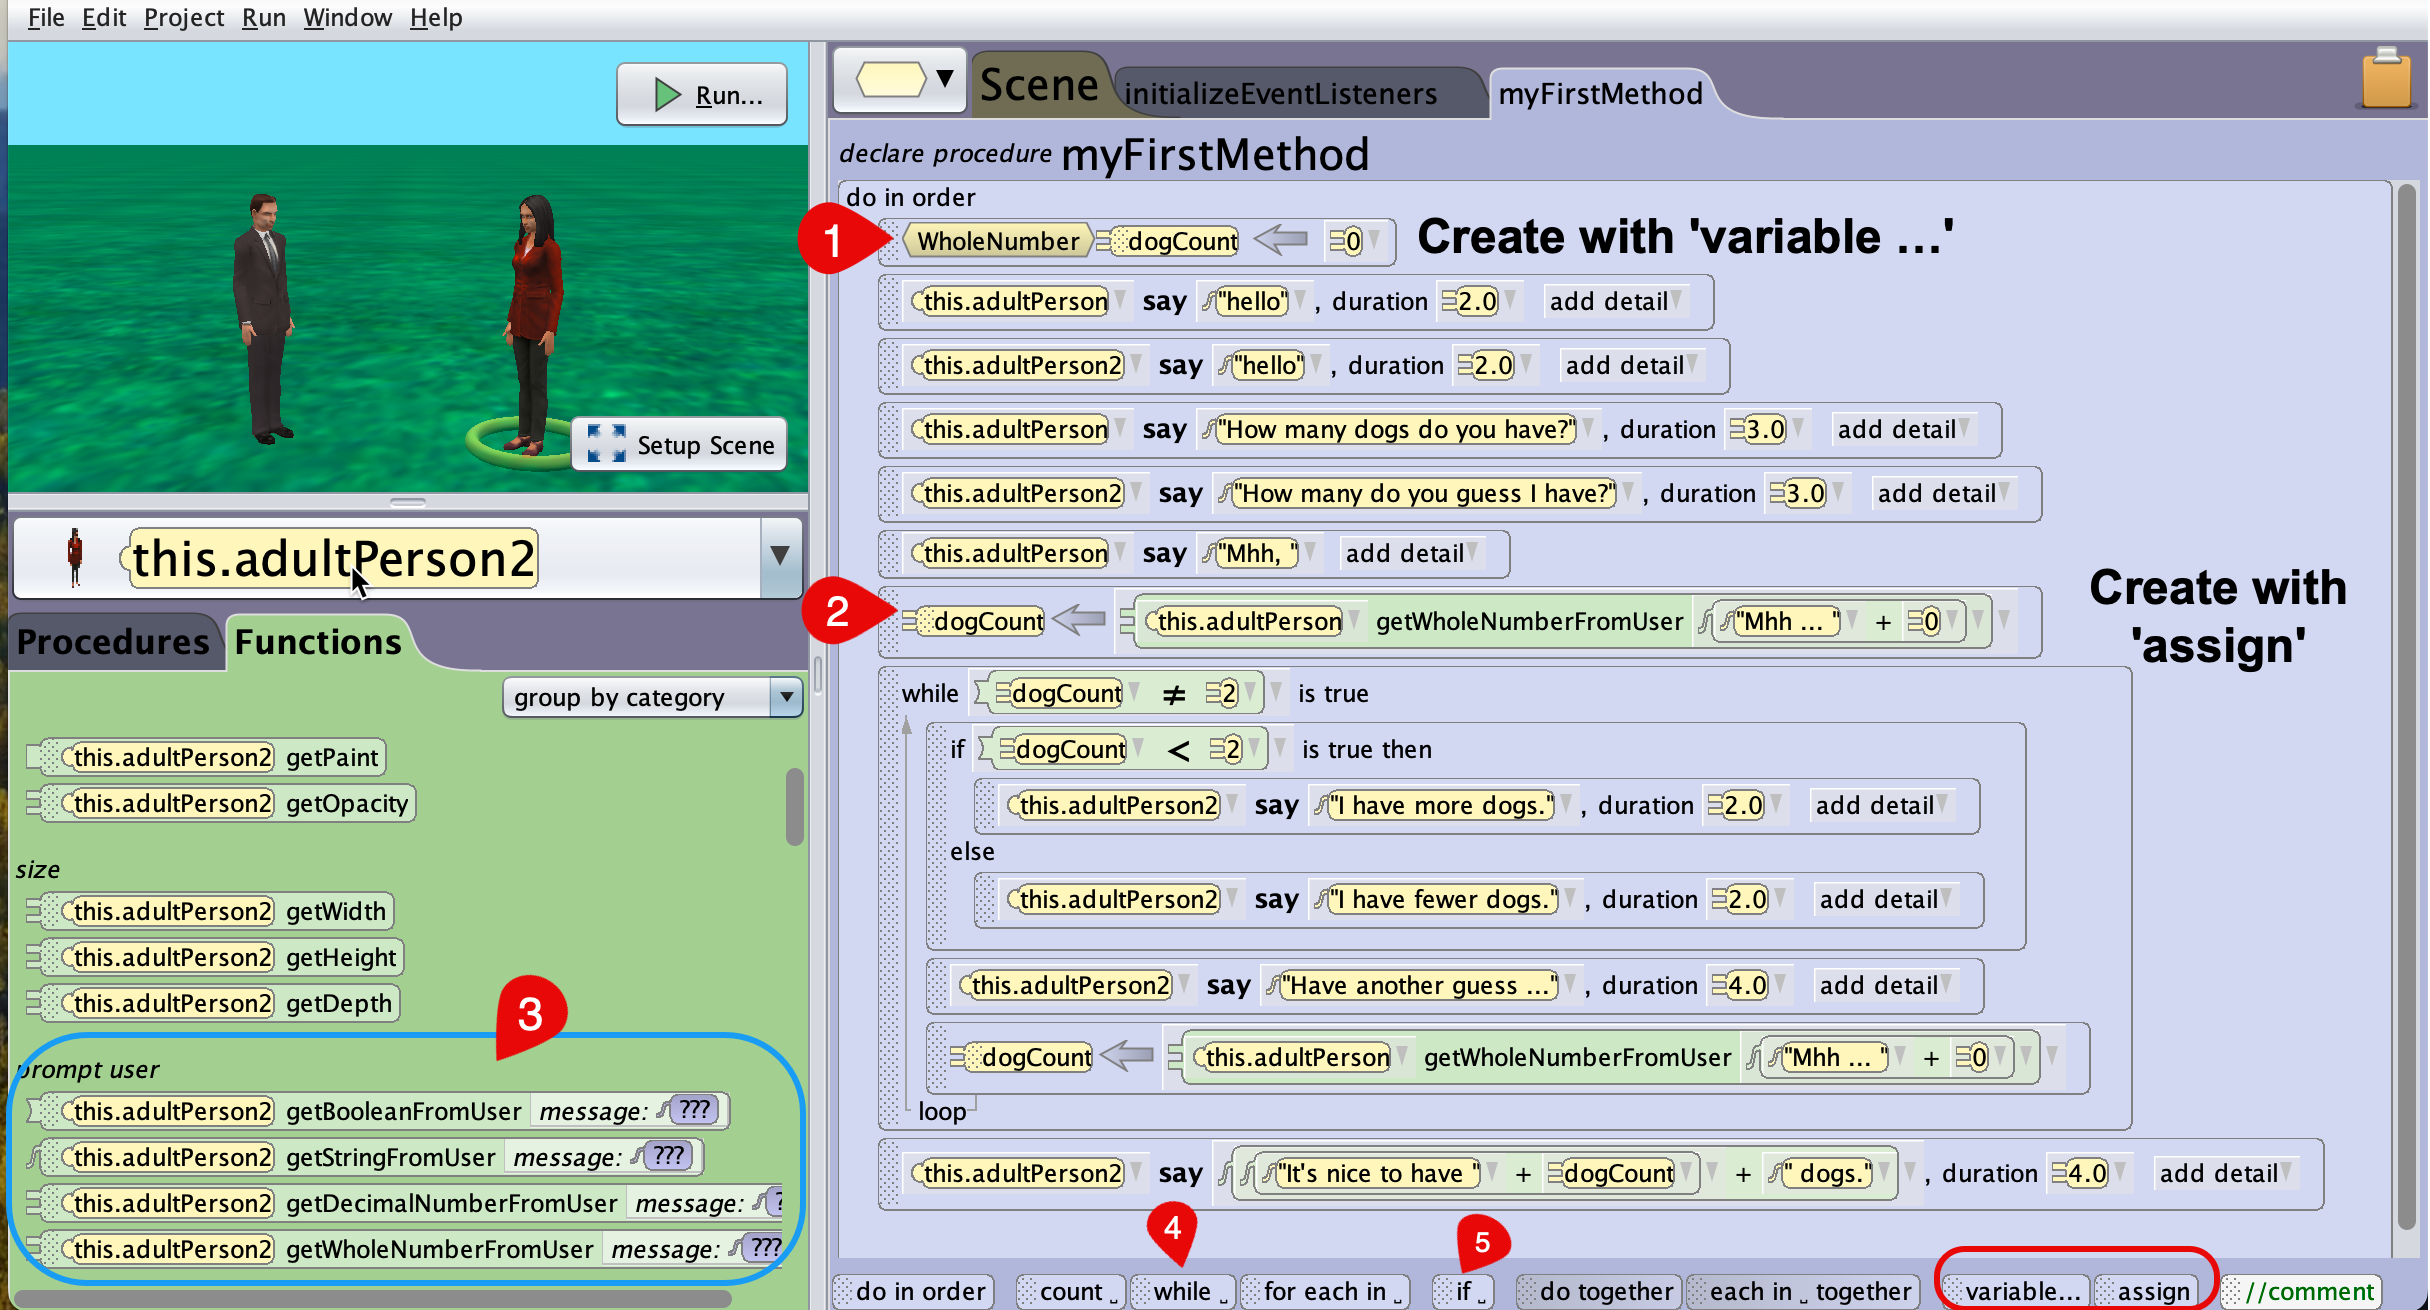
This small project contains all the basics you need for a small interactive program. While the say blocks come from the persons’ procedures, variable, assign, while, and if can be found at the bottom of the window. Just drag and drop them on the code window and then unfold the options to design your statements. Here are some further remarks.
1. Declare and initialize a variable
Drag and drop a variable placeholder from the bar below to the coding panel. Then this window will pop up.
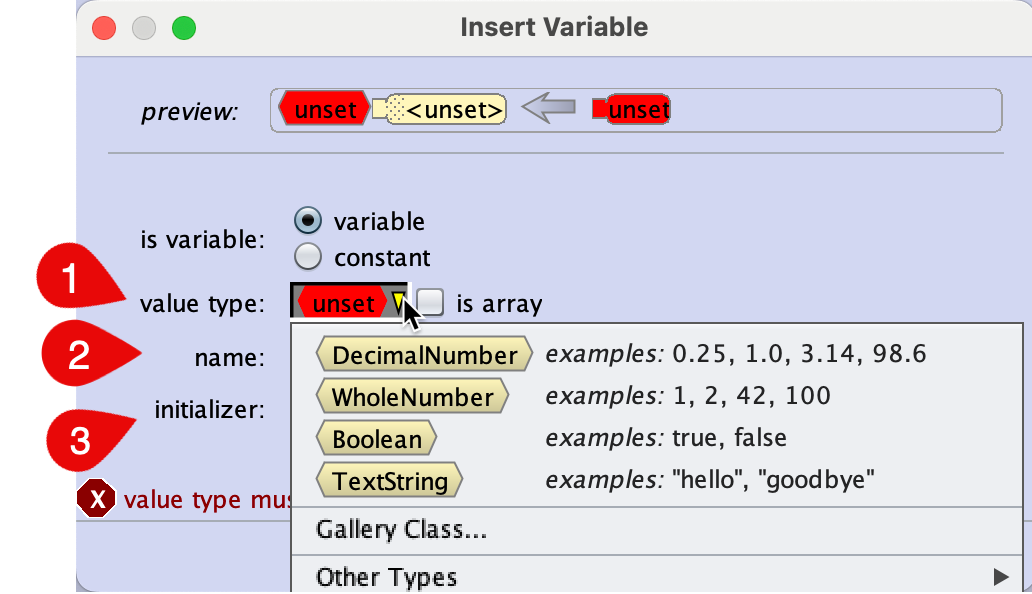
Follow the three numbered steps required to set up your variable
- Chose its type, mostly it will be one of the four basic data types.
- Give your variable a name, so that you can later address it.
- Give your variable an initial value to start with.
2. Assignment
While your program is running, the variable will often change its value. This you do with the assignement operator. On the left of the = is the name of the variable that will change its value, on the right you put the new value. Often, when you are creating an assignment, in the beginning you will put a placeholder of the proper type at the right side of the = sign. Later, you will then drag and drop a function with matching output data type on the right side of the assignment.
Be aware that Java is very picky with data types for assigning and applying operations to values. They must have same or “similar” types. In case you cannot drag and drop a value or a function on a field, this is a hint, that there is a type mismatch.
3. Input
The input of values is implemented as functions, one function for every data type you can input (decimal numbers, whole numbers, boolean values (YES or NO, True or False), and text (Strings). In order to use them, first create an assignement for a variable you created earlier of matching type for your input function, then drag and drop the input function get...FromUser on the right side of your assigment (2).
4. and 5. while loop and conditionals with if
These elements are also dragged and dropped on the coding panel. First, you will just select a true or false constant, once the block is fixed, you click through and assemble your logic. All variables that you have created beforehand, are also visible, so you can select them where necessary.
About Events
An introduction to event handling
All program code we have done so far is executed as described in the procedure myFirstMethod. While this main method uses procedures, functions, and properties from all over Alice, they are executed statically, one after the other, as described in said method. So far we have not seen any way to interfer in this predfined execution. While this may be ok as long as we only want to tell a story, this is not acceptable any longer if we want to create a game. The user needs to interact with the game using the keyboard or mouse, and we may even have some interaction of game objects with each other at an unforseen moment, maybe due to the user’s intervention.
Alice uses so called Eventlisteners for various types of events. These routines are always listening in to discover predefined events (mouse clicks, begin of program, colliding objects, …). There are several different types of Listeners you can initialize that discover different types of events. In case a particular Listener notices an event of the type it monitors happening, you can create code that will react to that particular event. This is code is then run outside of the myFirstMethod, maybe in parallel.
Here are two examples.
If you have set up a Listener for the arrow keys on the keyboard, and the user is pressing the up key, you could program your main character in the game to move forward. You can also make your main character stop if he collides with a prefined object in the game.
Alice provides eventListeners for the following types of events:
- At scene activiation (begin) or a defined point in time thereafter
- various keyboard button interaction,
- The Object Mover Listener assigns the arrow keys to an object that the player can steer without the need of any further code
- Mouse events
- Position and orientation events to detect collision and/or proximity
In this session we will focus on movements with the arrow keys and the basics for proximity detection to create a small game. User enabled events also include further means to configure the triggering process with add detail, those we will cover in the next part of the series.
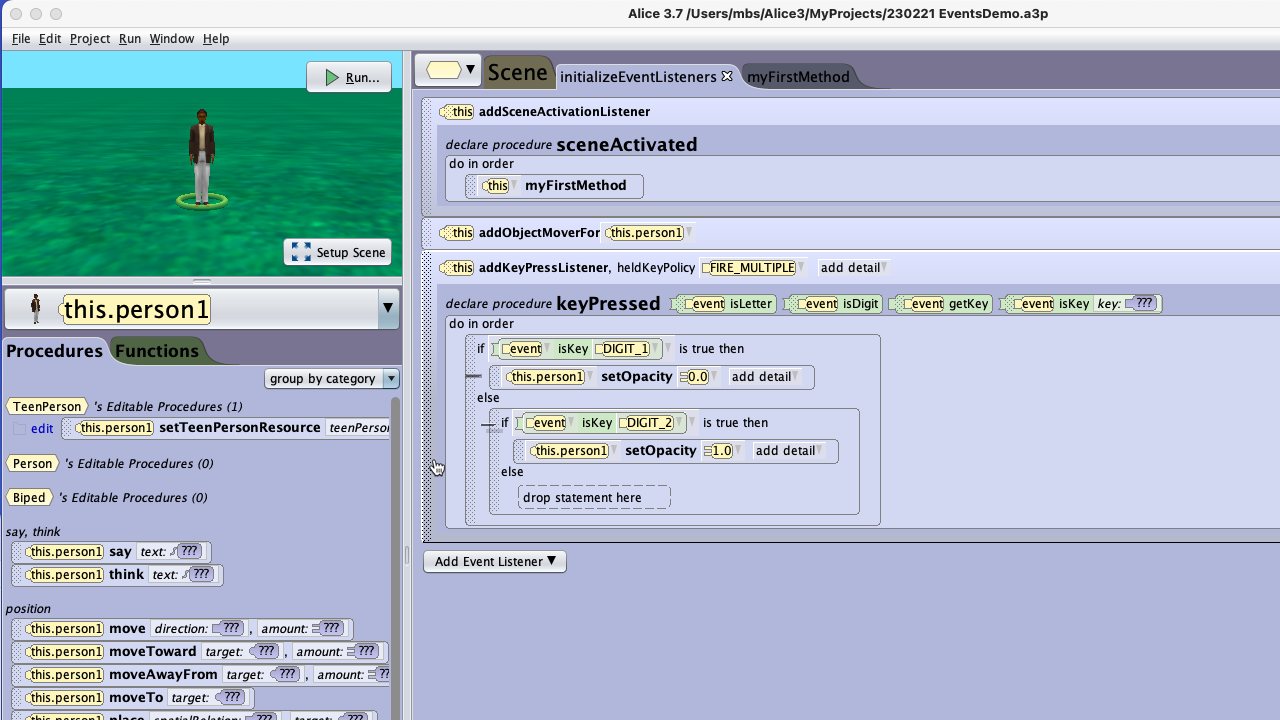
Example 1 - Person moves and disappears
The project below implements a simple example. There are two eventListeners implemented,
addObjectMoveForallows the viewer to steer the position of the object Alf by using the arrow keys. This can be any model.addKeyPressListenerallow the viewer to make Object Person1 disappear (Press 1) or (re)appear (Press 2) using the opacity property.
Example 2 - Mars Rover

The scenario comprises the Mars Rover named redRover on a Mars alike setting with some props placed on the ground. The rover can be moved using the arrow keys. Whenever the rover approaches one of these props more than one meter, the rover will say the name of the obect that it is close to.
The movement of the rover is implemented in the same way as in example 1. Just open the initializeEventListeners tab and create an addObjectMoverFor block linking the rover as object you want to steer. Here is the complete code for the game.
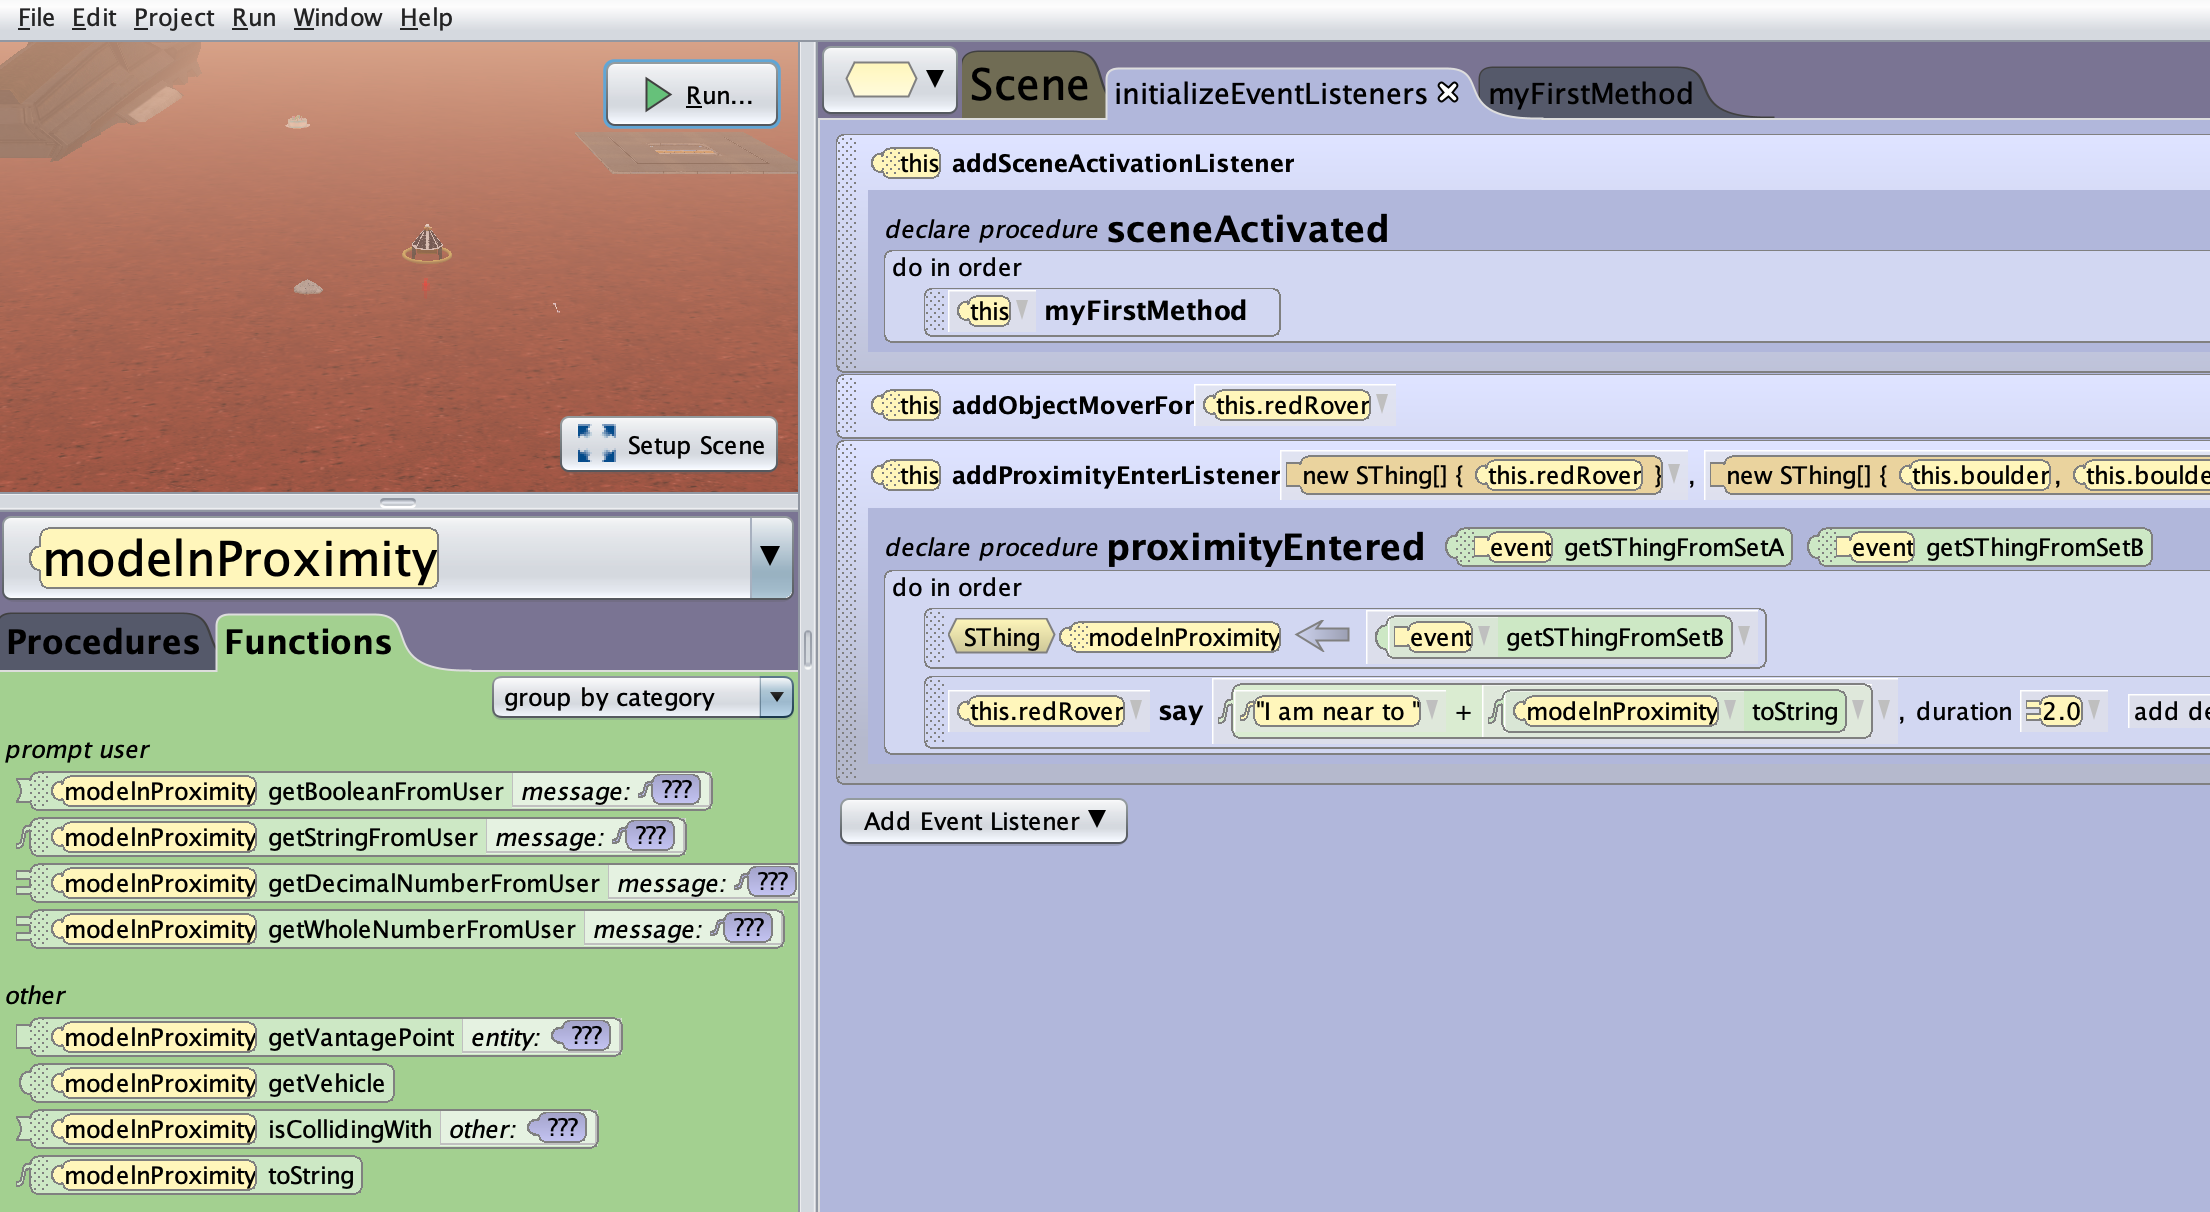
Adding the proximity listener is a bit more complex. Again, click on Add Event Listener and then unfold the structure as shown.
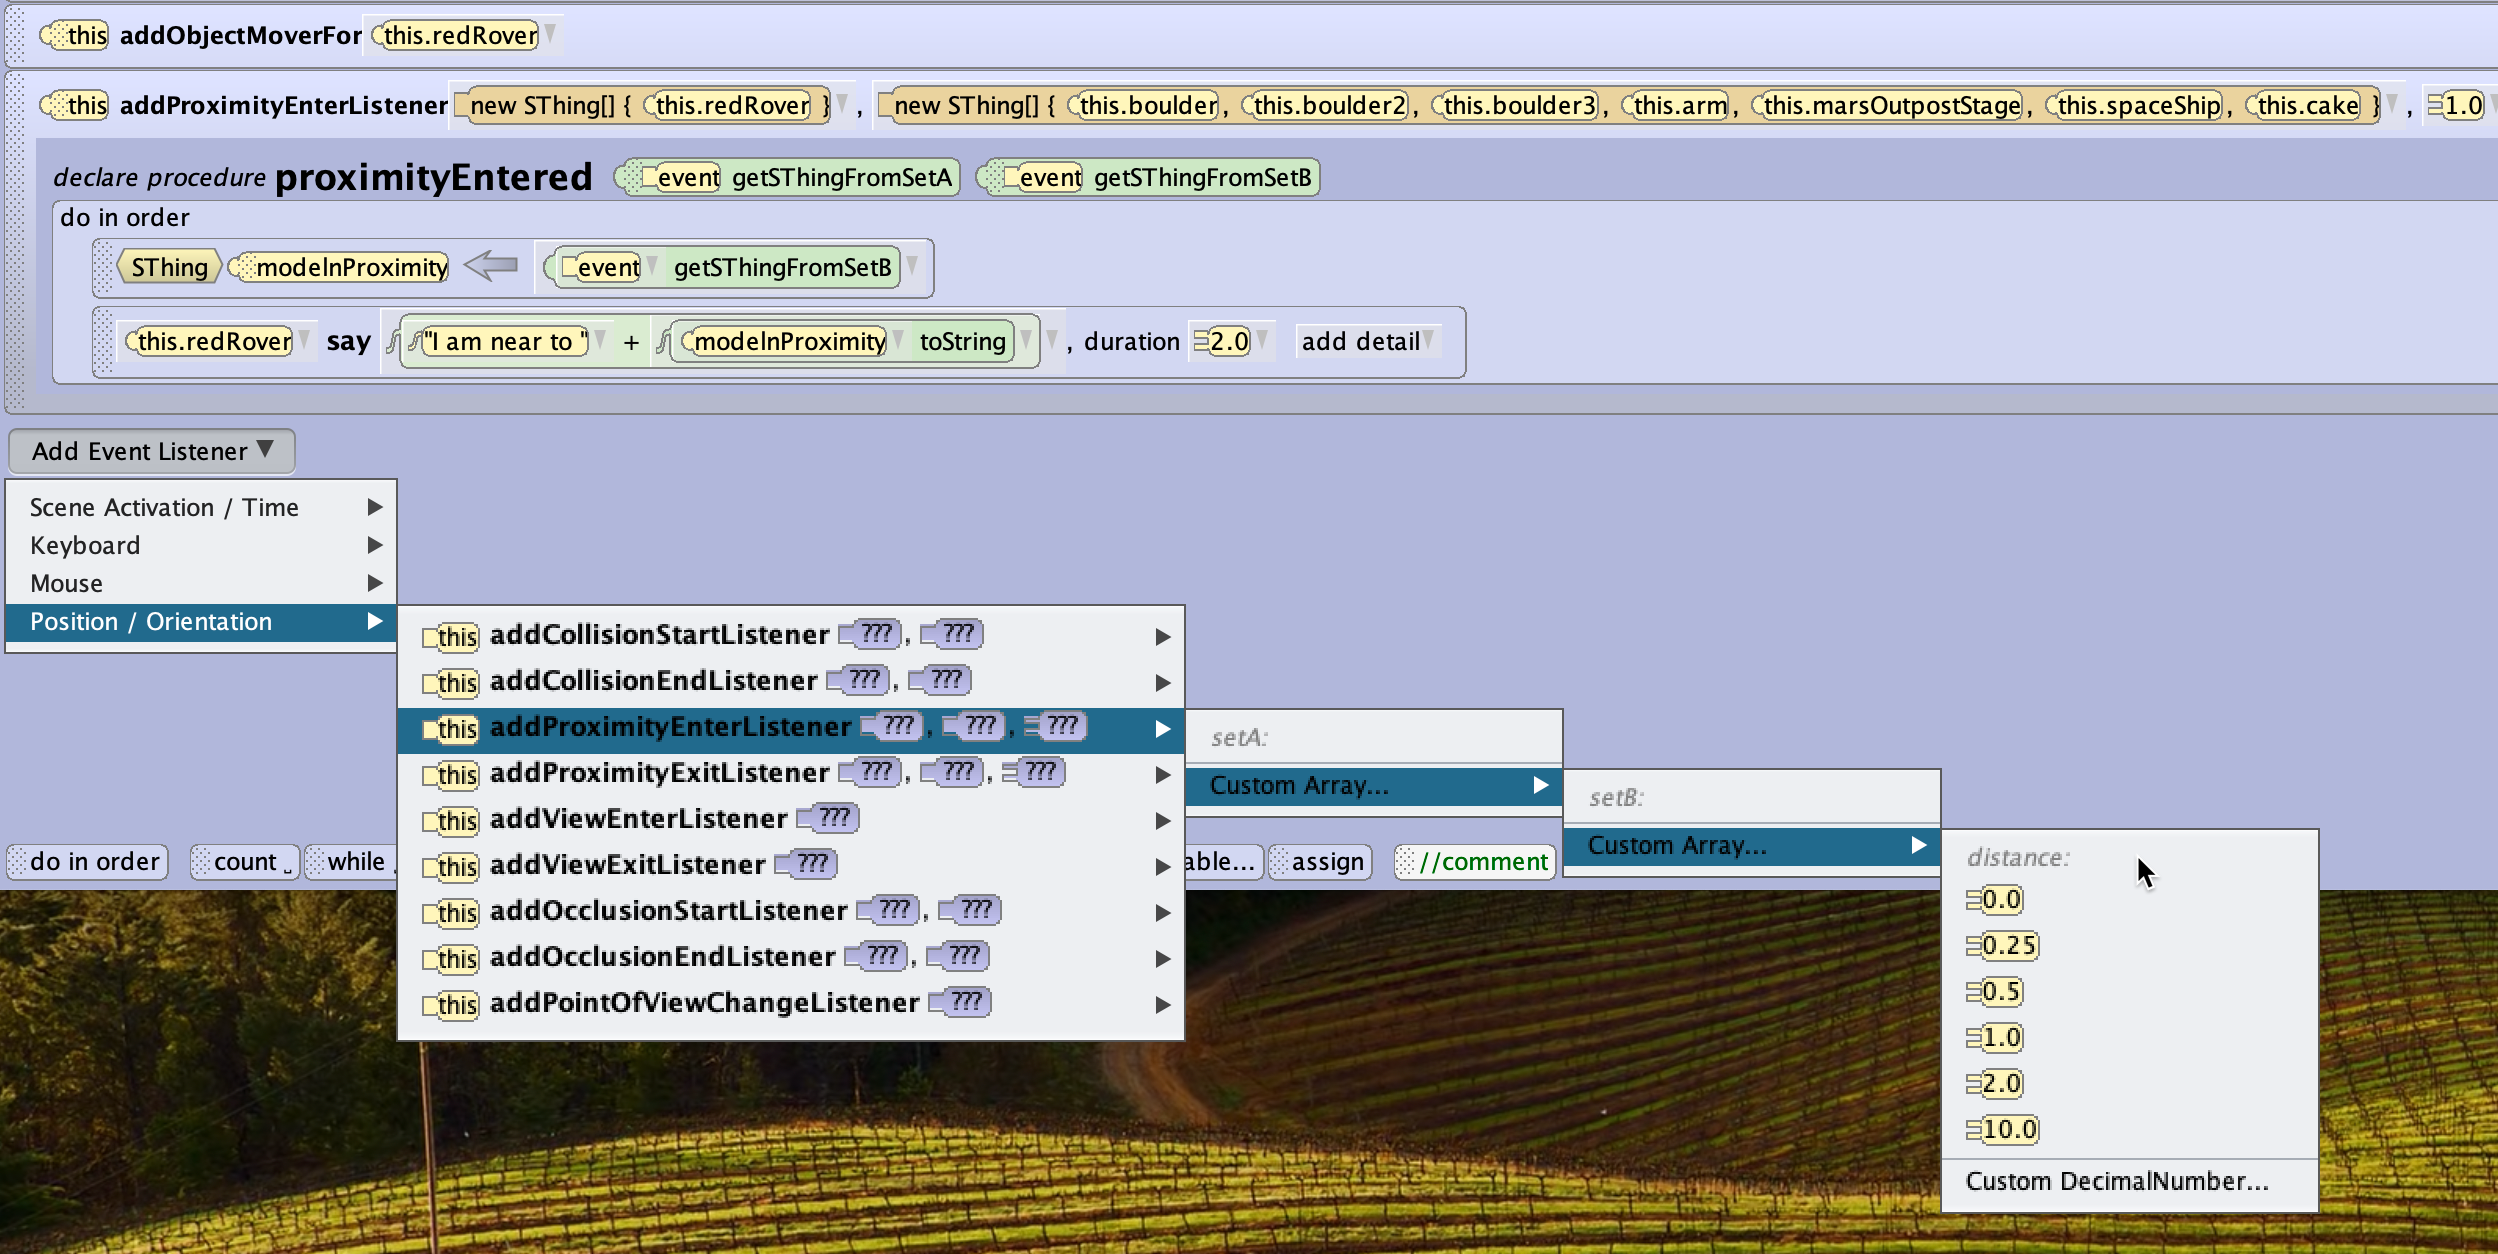
During the process, you also need to add objects as setA and setB. As you can see in the complete code listing above, setA only contains the robot, setB contains all objects you want the robot to detect. The last parameter is the distance between robot and object to trigger an event.
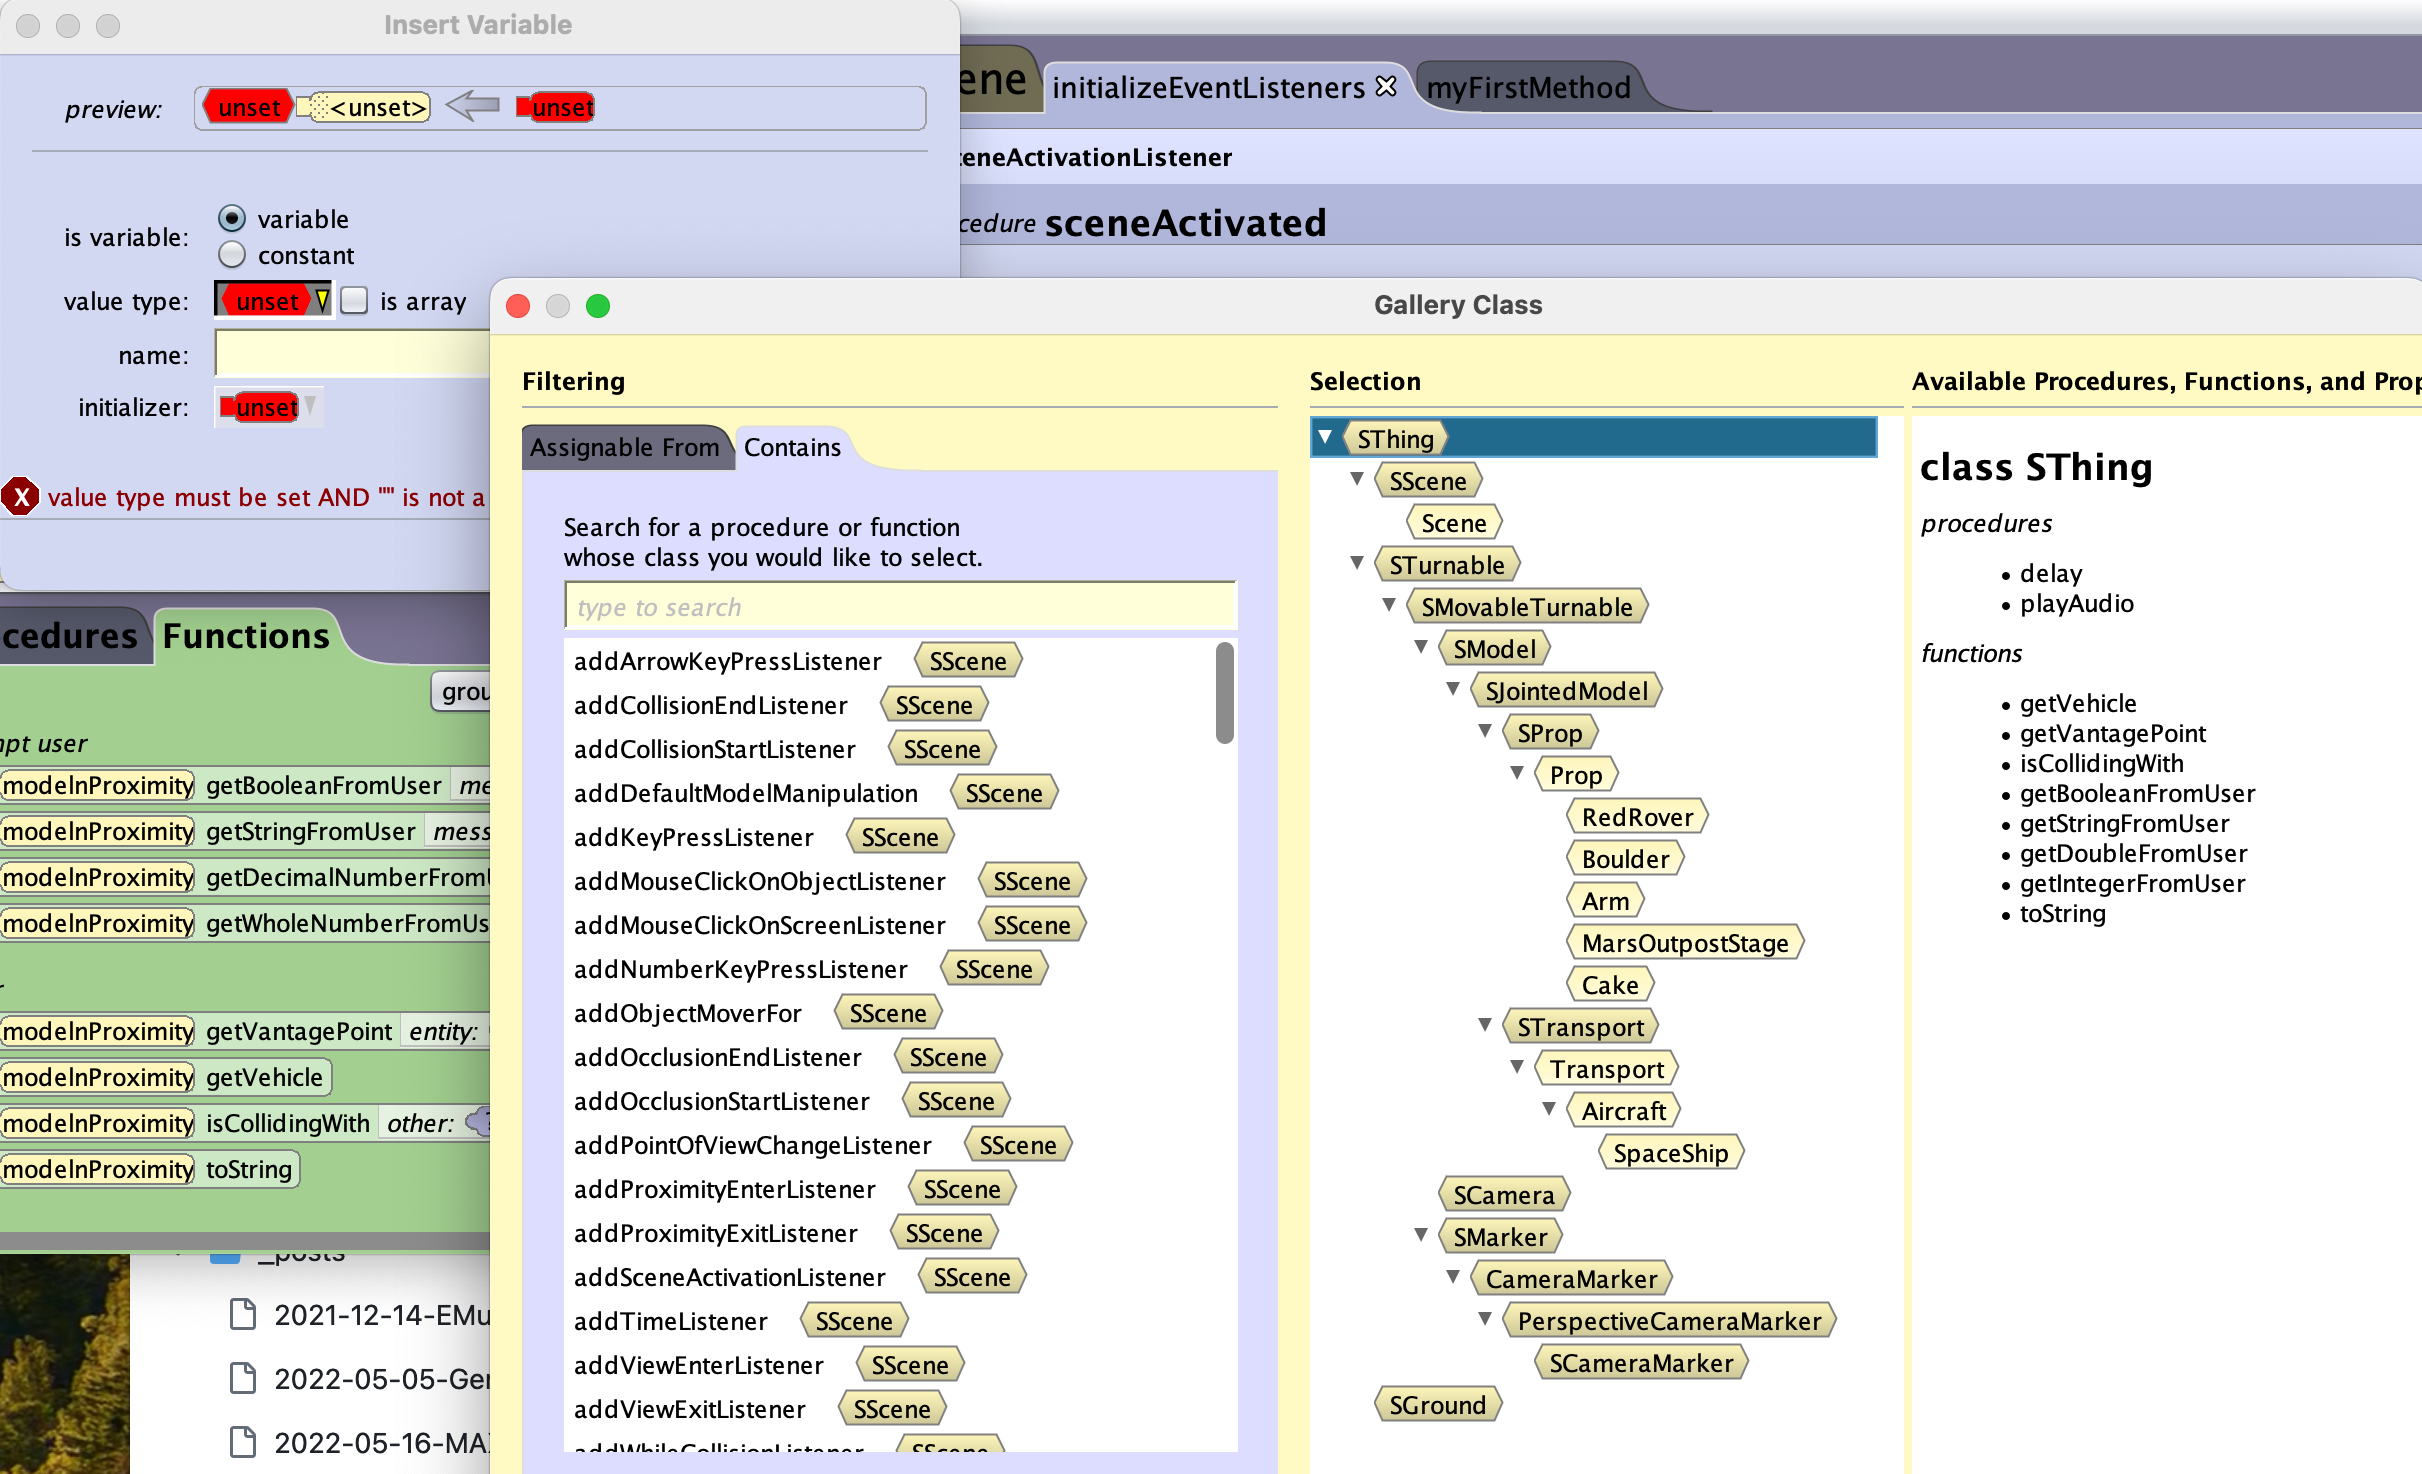
Once you have created the procedure for the event, you need to create a variable to hold the objects that are reported triggered by the listener. When doing so earlier in this post for primitive data types, it was straight forward matter. This time we have to choose the proper type as there seem to be a choice. You may recall that in Alice all objects are arranged in a class hierarchy, inheriting procedures/function/properties from their parents or superclass, while adding new ones by themselves, inheriting them to their children classes. The screenshot above shows you what you see when creating a new variable and selecting value type and then click on Gallery Class.
Under Selecton in the window you see all procedures/functions/properties available for the particular class chosen in the middle panel. The variable you declare here will later hold a reference to the object the rover is in proximity to. In order for the class to qualify holding your model class from the game, it must be in general of the same type or “above” your class in the tree structure. The higher up in the tree a class, the more universal it is and generalizes all classes below. In our case we actually do not have a choice. The parameter in the addProximityEnterListener ... procedure fo the setA or setB is of type SThing, so our new variable must be of the same type.
So the SThing class can hold any other object in the game. On the other hand you notice that the top class only has a very few procedures/functions/properties it shares with the lower classes. So choosing the correct level/class type for your variable determines what you can later do with it as you can only use those procedures/functions/propoerties avaiable for the chosen data type of the variable.
For the game the class SThing was selected. Once you have created the variable, you need to add an assign block (see again earlier in this post). Inside the say block, I used the function ... toString that converts the object name into a string so that it can be printed out. When you go back to the screenshot of the declaration of the variable, you see the function’s name on the list at the right side.
The last screenshot shows what happens when you approach one of the props on the ground.

More explanations are given in the Alice 3 How-To Guide that I also uploaded to the repository for this module. Download the repository, you find an introduction about Events in part 4 of the handbook.